Edit or add new DocAssist content controls to the DocAssist Editor ribbon in Word
Download and install an Office RibbonX Editor
We recommend using an Office RibbonX Editor for customising the ribbon XML with Word templates. Download the latest version from https://github.com/fernandreu/office-ribbonx-editor
Backup the DocAssistEditor.dotm template
- Close Microsoft Word.
- Create a backup copy of the DocAssistEditor.dotm template before making any changes. (We suggest copying the file to a location where you have rights to modify the file, like your Documents directory or the Desktop).
Adding/modifying xml code
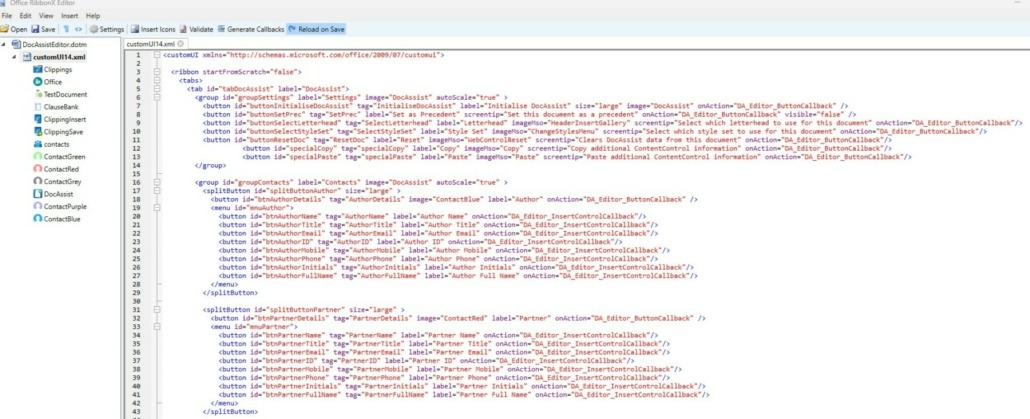
- Run Office RibbonX Editor, and open the DocAssistEditor.dotm template from the location you copied it to via the Open button.
- In the left pane, double click on the customUI14.xml node, and the CustomXML for the pane should appear in the right hand pane.
- Add the code for the additional DocAssist Word Content Controls to be added to the Word/DocAssist Editor ribbon to the xml file.
- If new content controls are required, ensure you add the new DocAssist Word content controls in correct location, this is usually under <group id=”groupContacts” label=”Contacts” image=”DocAssist” autoscale=”true”> or <group id=”groupData” label=”Data” image=”DocAssist” autoscale=”true”>
- An existing line or section of xml code can be copied/pasted to add new content controls.
- Ensure you paste into the location where you want to see the new DocAssist Word content controls in the dropdown list.

Breakdown – xml code for adding DocAssist Word content controls in DocAssist Editor ribbon via a split button/dropdown items in an existing group id
- splitButton id name must be unique for each item added
- size of split button
- menu id name must be unique for each item added
- button id name must be unique for each item added
- label is what will appear on the Word ribbon
- tag must be the DocAssist Word content control tag name
- imageMso can be any image you choose to select from Microsoft’s inbuilt images, you can Google and download a list.
- screentip will be what appears in an information bubble to user when hovering over item
- onAction this will be the name of the macro (callback) in Word that is called.
“DA_Editor_InsertControlCallback”. This is the default macro name that takes the value from the Tag in the XML, and uses it to create a new Word content control based on the tag name.
- Use the Validate button to ensure no issue with code changes. This will highlight errors if any.
- Save and Close xml file.
- With Word still closed, test your changes by copying the Word macro enabled template into the Word start up location specified in the Word Startup Templates path.
- Reopen Word and the New menu should show your modifications to the DocAssist Word templates. If none of the customisations show, then recheck your changes and ensure you Validate the xml before saving. One little typo will make all modifications disappear.
Adding/modifying the VBA code in the DocAssistEditor.dotm
- Open the DocAssistEditor.dotm – right mouse click on the template and select “Show more options” & “Open”
- Alt/F11 toggles in and out to the VBA editor
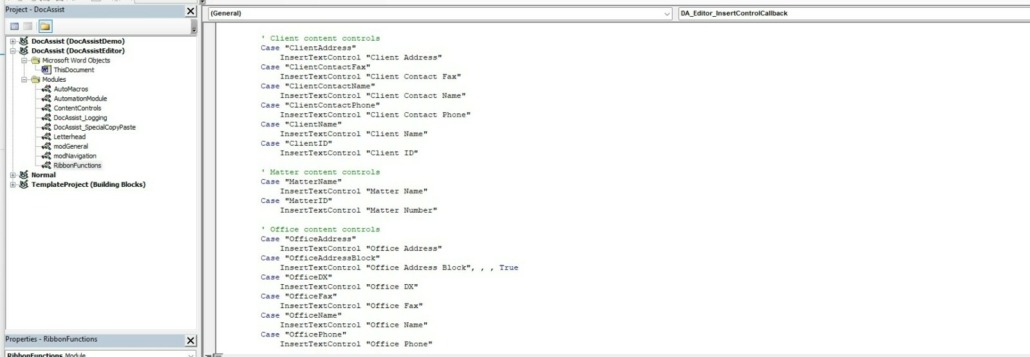
- In the VBA editor – select the Modules folder
- Select the module RibbonFunctions
- Select the procedure “DA_Editor_InsertControlCallback” from the list of procedures in the right dropdown list
- Copy/paste a section of VBA code and amend to new case/tag name/s
- Insert the type of content control that should be used ie InsertTextControl or InsertDateControl etc.
- Select Debug/Compile DocAssist from the main menu (to ensure no errors with code)
- Save and Close DocAssistEditor.dotm
Testing
- Test changes on Editor ribbon by creating a blank document, intialising DocAssist and selecting the new content controls from the dropdown list.
- Deploy modified DocAssistEditor.dotm to all DocAssist editors.